Reading the Documentation (WS)
Each page in our API documentation follows a particular structure so as to make it as easy to use as possible. This article explains the structure of our documentation pages as well as some of the key concepts found in the documentation. The article also shows how the code examples found in our documentation pages can be interpreted and used. We will use the JavaScript examples here.
Public WS Channels
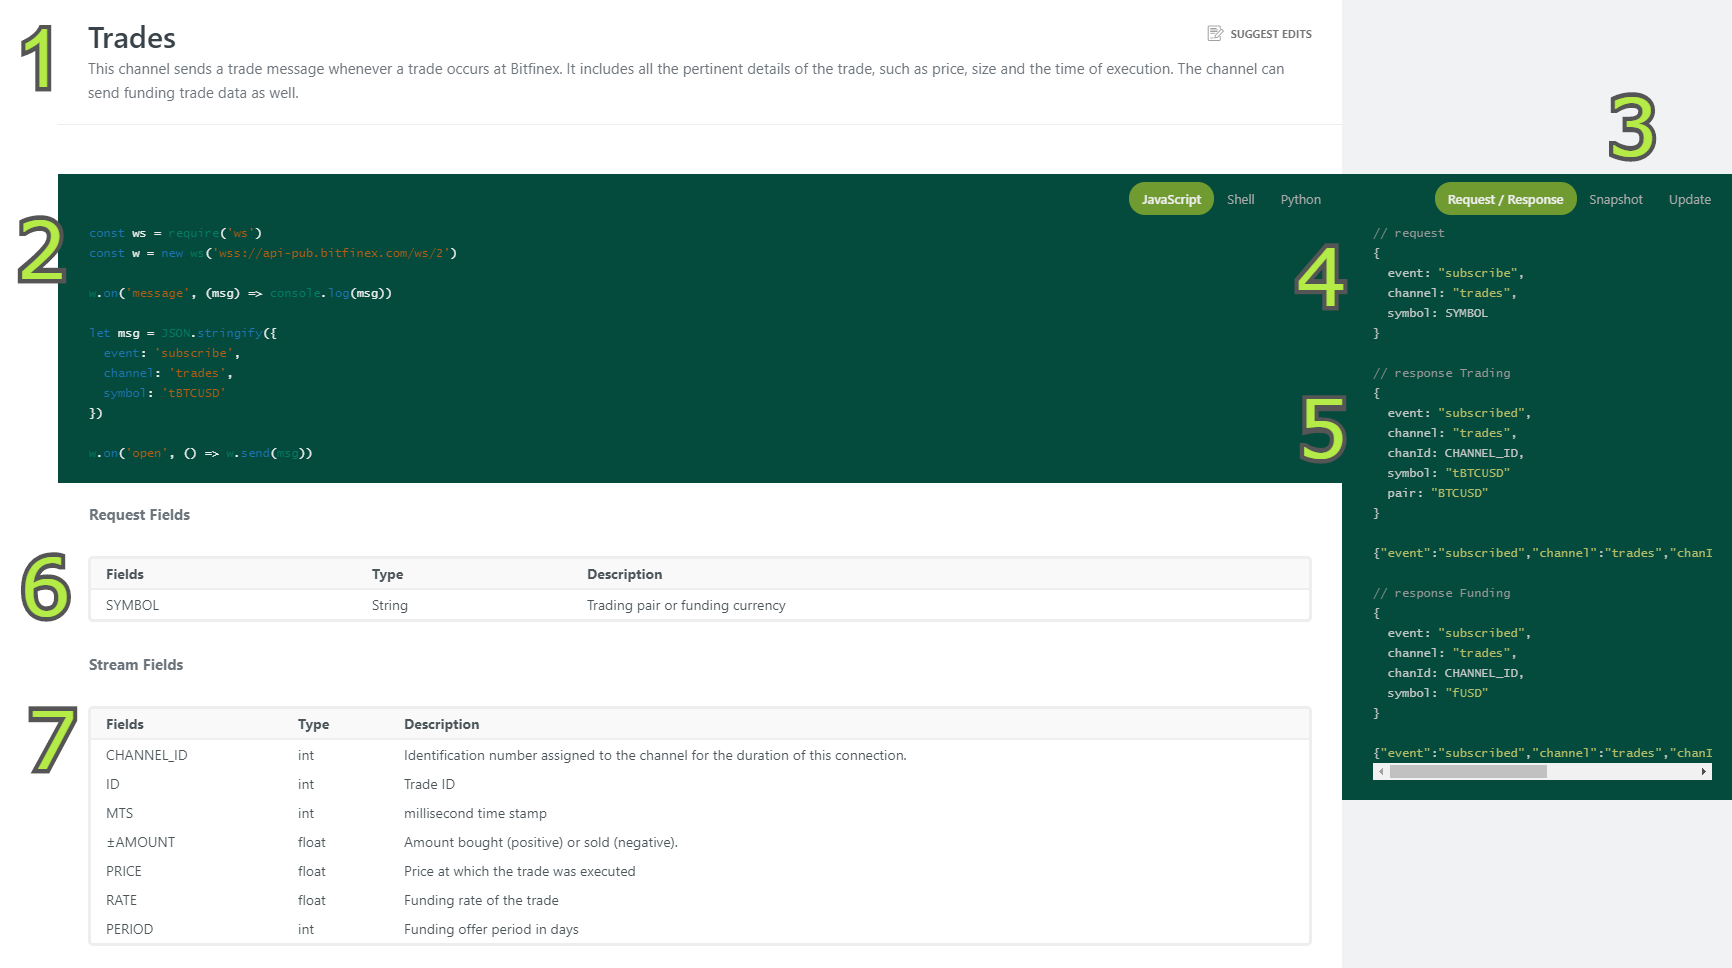
Below is an example of a documentation page for a public WS channel (click the image for a zoomed view).

- A title and short description of the general purpose of the channel.
- Example code to subscribe to the channel.
- Here you can select if you would like to view the model payload / response for subscribing to the channel, the structure and an example of a snapshot provided through the channel, or the structure and an example of any updates sent through the channel.
- A model payload showing the different requests fields. In the Snapshot and Update tabs this shows a model of the snapshot or update using the stream fields found at 7.
- An example response to the channel subscription. In the Snapshot and Update tabs you will find an example response with actual data here (below the model using stream field names).
- Request fields that can be altered to change which data the feed will provide. In this example, the SYMBOL can be changed in the payload to determine for which trading pair you would like to receive trades data.
- Stream fields show the different fields that can be present in a response. any field that you can find in the response map at 4. will be listed here with the expected data type and an explanation of field's content.
Account Info Channel Events
Account info channel events provide snapshots and updates regarding your account. You can learn more about this on the Account Info page.
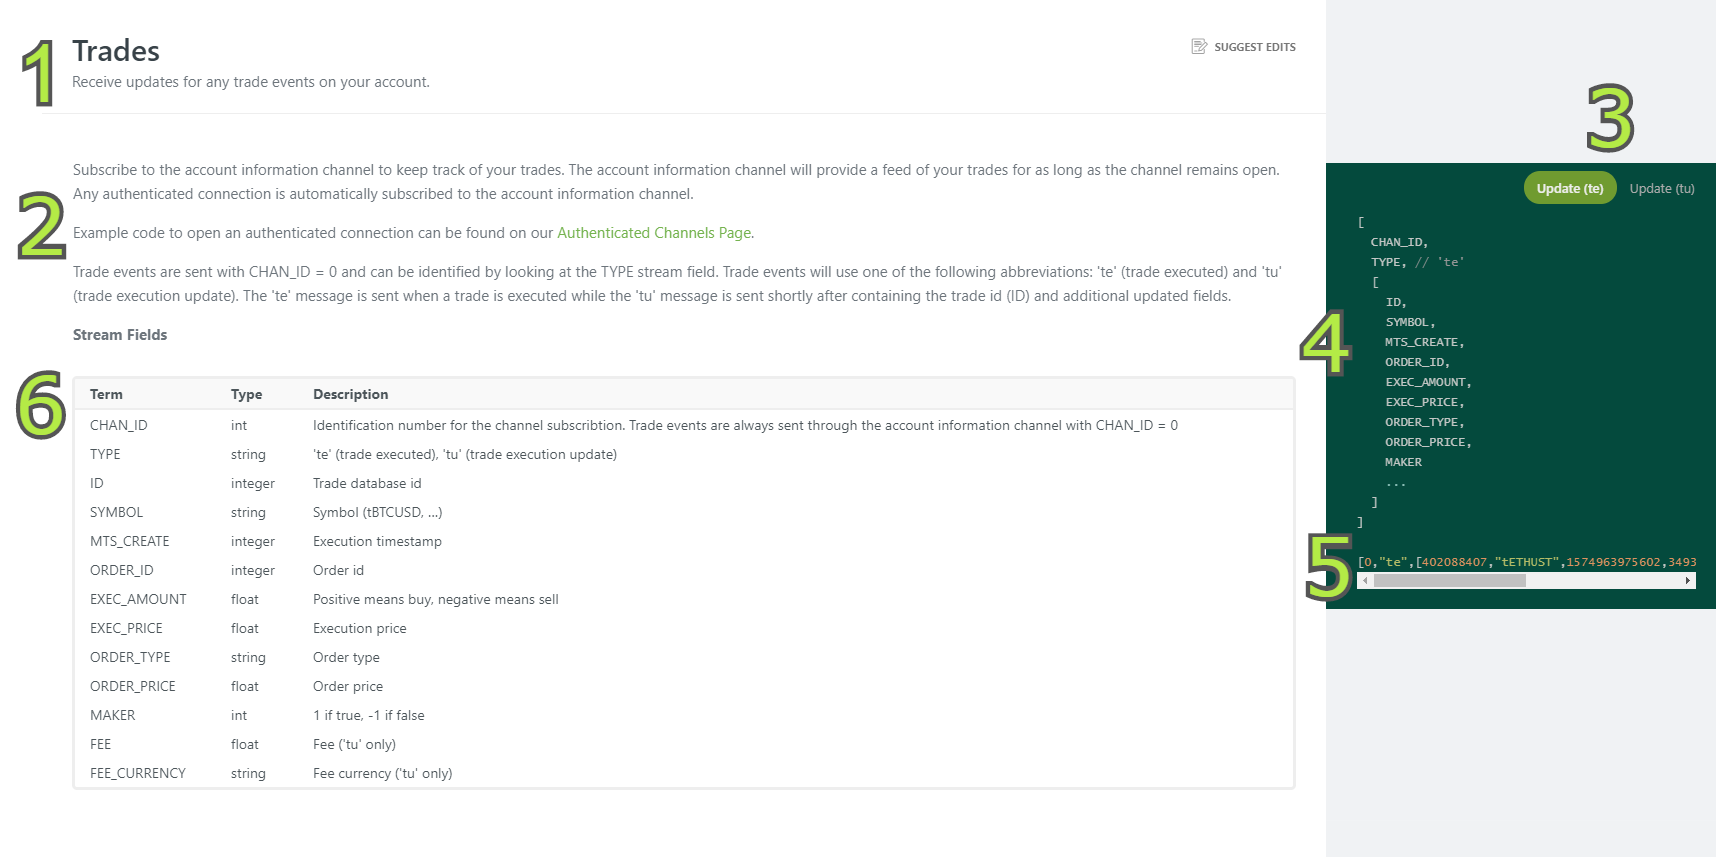
Documentation pages for account info channel events are structured as follows:

- A title and short description of the general purpose of the events.
- A general explanation of the account info channel and of the expected events and their associated TYPE codes.
- Tabs that allow you to view either the snapshot or updates. (Not all of the account data in the account info channel has a snapshot, for some data there are only updates).
- A model of the snapshot/update using stream field names. These names correspond to the stream fields at 6.
- An example of the snapshot/update using actual data.
- Stream fields show the different fields that can be present in an snapshot/update. Any field that you can find in the event models at point 4. will be listed here with the expected data type and an explanation.
Websocket Authenticated Inputs

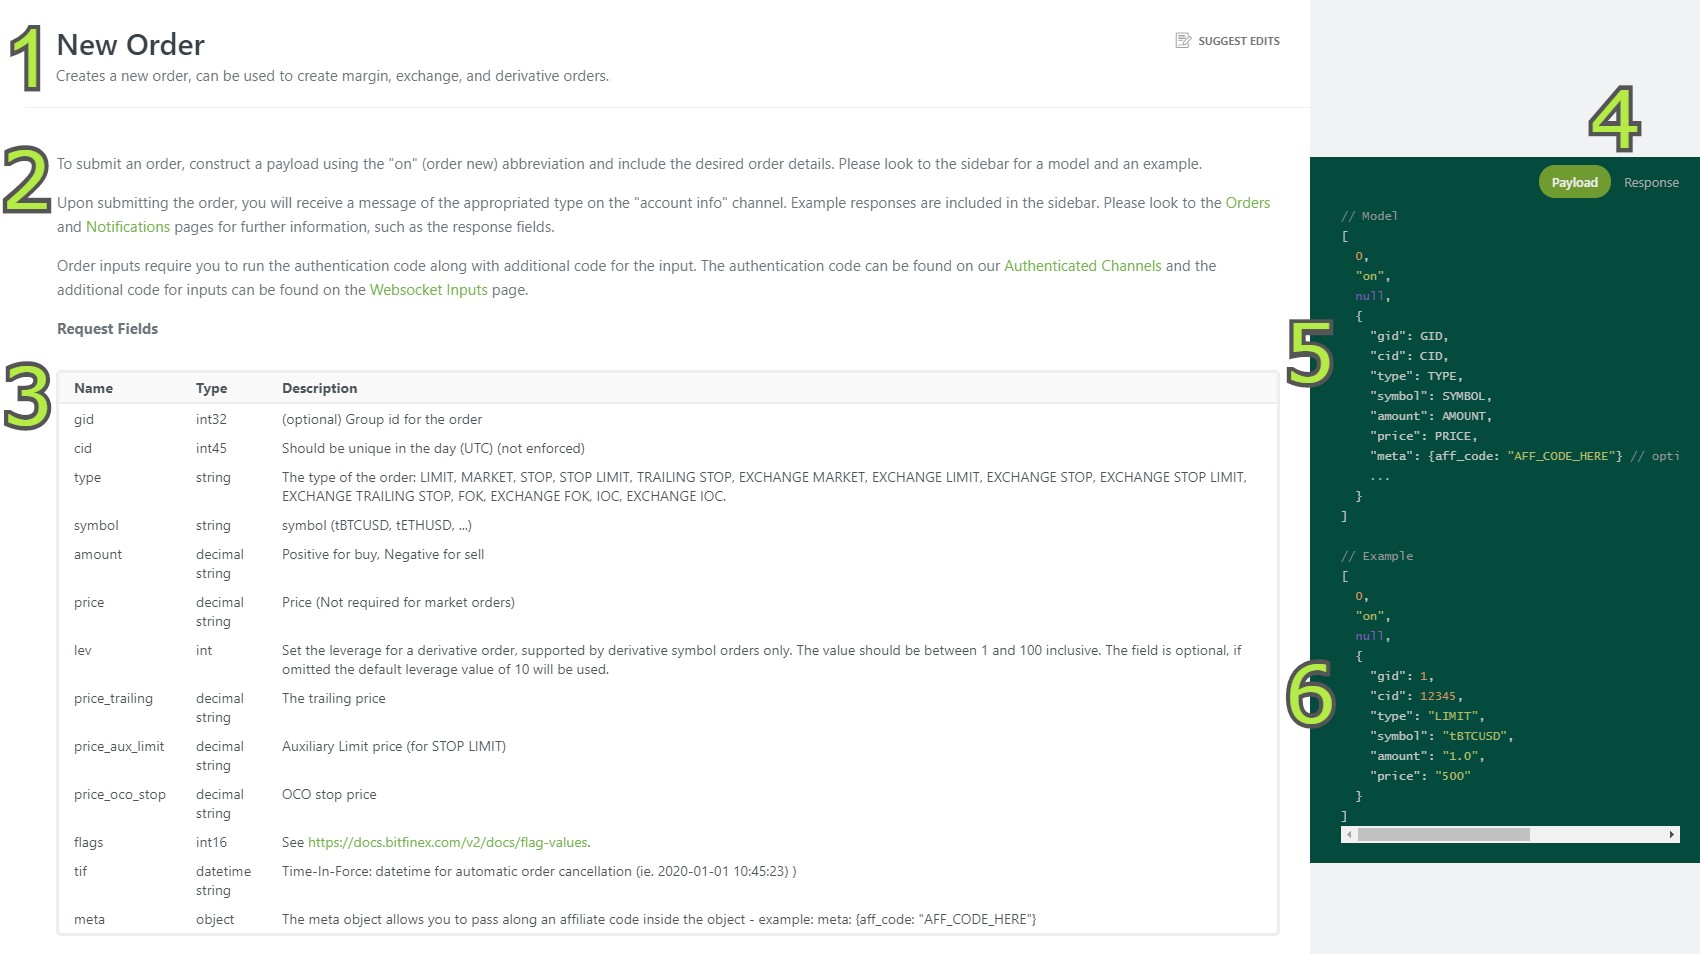
- A title and short description of the general purpose of the events.
- General explanation of WS inputs.
- Shows all the requests fields that could be added to the payload. A model of the payload can be found at 5. Any request fields not included their can simply be appended. Mandatory request fields are always shown in the example payload.
- Here you can switch between viewing the payload model/example and the expected response.
- A model payload showing how to enter the different request fields. The corresponding request fields can be found at 3.
- An example payload with actual values entered.
Example Payload for Websocket Inputs
Below you can see an example payload for placing an order. the example payload does not include all possible request fields, but any additional fields can be appended.
[
  0,
  "on",
  null,
  {
    "gid": 12345,
    "cid": Date.now(),
    "type": "LIMIT",
    "symbol" "tBTCUSD",
    "amount": "0.02",
    "price": "6500"
  }
]
To send the payload, you will need to add it to the authentication code found on the Authenticated Channels page along with some additional code found on the Websocket Inputs page. The end result for an order using the fields shown in the example payload above would look like this:
const crypto = require('crypto-js') // Standard JavaScript cryptography library
const WebSocket = require('ws') // Websocket library for Node

const apiKey = '<API_KEY_HERE>' // Users API credentials are defined here
const apiSecret = '<API_SECRET_HERE>'

const authNonce = Date.now() * 1000 // Generate an ever increasing, single use value. (a timestamp satisfies this criteria)
const authPayload = 'AUTH' + authNonce // Compile the authentication payload, this is simply the string 'AUTH' prepended to the nonce value
const authSig = crypto.HmacSHA384(authPayload, apiSecret).toString(crypto.enc.Hex) // The authentication payload is hashed using the private key, the resulting hash is output as a hexadecimal string

const payload = {
  apiKey, //API key
  authSig, //Authentication Sig
  authNonce,
  authPayload,
  event: 'auth', // The connection event, will always equal 'auth'
}

const wss = new WebSocket('wss://api.bitfinex.com/ws/2') // Create new Websocket

wss.on('open', () => wss.send(JSON.stringify(payload)))

const inputDetails = {
  "gid": 12345,
  "cid": Date.now(),
  "type": "LIMIT",
  "symbol": 'tBTCUSD',
  "amount": "0.02",
  "price": '6500'
}

const inputPayload = [0, 'on', null, inputDetails] // Note how the payload is constructed here. It consists of an array starting with the CHANNEL_ID, TYPE, and PLACEHOLDER and is followed by the inputDetails object.

//Websocket Listener

wss.on('message', (msg) => {     // The 'message' event is called whenever the ws recieves ANY message
let response = JSON.parse(msg)
if (response.event === 'auth') {
  wss.send(JSON.stringify(inputPayload));// Submit payload for input
}
console.log(msg); // ALL ws receipts will be logged to console
})
Note how in this code you only need to change the inputDetails according to the type of input you wish to perform along with changing the TYPE abbreviation in the inputPayload. Which TYPE to use can be found on the documentation page for each different input event. You can also find a full list of the abbreviations used in our WS API in our Abbreviation Glossary .
Do note that this is just example code. If you wish to send multiple orders, there is no need to run the authentication code each time. Once an authenticated connection is opened you only need to send the payloads through the open channel.
Updated 8 months ago
